Step-by-Step Guide to Installing a Rear View Mirror Camera System
Installing a rear view mirror camera system can significantly enhance your driving experience, providing you with a clear view of what’s behind your vehicle. This guide will walk you through the process from start to finish, with each step designed to make installation straightforward and accessible for beginners and enthusiasts alike. Whether you’re installing a rear view mirror camera or upgrading to a rear view mirror dash cam, you’ll find all the information needed to complete the installation successfully.
Understanding the Benefits of a Rear View Mirror Camera System
A rear view mirror camera system provides a live feed of the area behind your vehicle, which can increase safety, simplify parking, and reduce the risk of accidents. Traditional mirrors are often limited in scope and obstructed by passengers, while a camera offers a wider field of view and eliminates blind spots. For drivers in crowded areas, these systems are particularly valuable for added security and convenience.
Choosing the Right Rear View Mirror Camera System
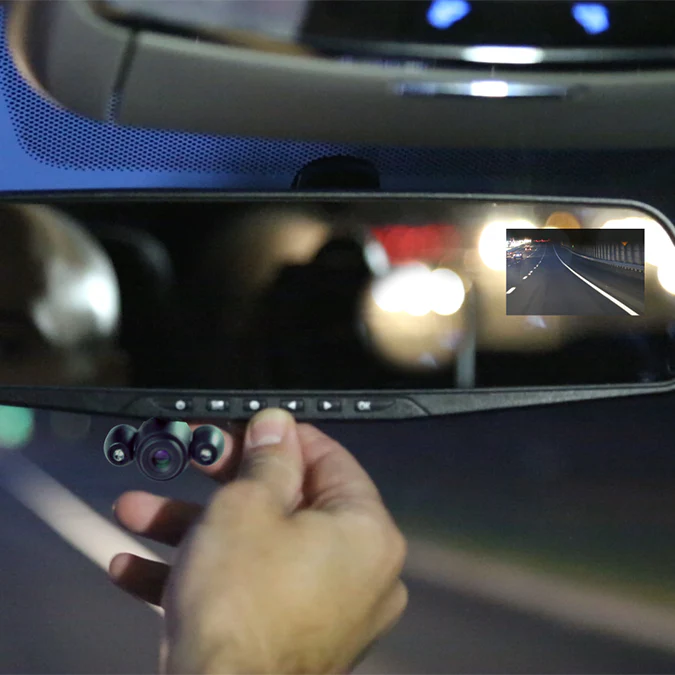
Selecting the right camera system is the first step to a successful installation. Evaluate features such as resolution, night vision, and field of view to meet your driving needs. Many systems are designed as rear view mirror dash cams, which combine a standard mirror with a display screen. Review each option and consider compatibility with your vehicle’s electrical system.
Gathering the Necessary Tools for Installation
Preparation is essential for a smooth installation. Collect all necessary tools such as screwdrivers, electrical tape, wire strippers, and a fuse tap for connecting to the vehicle’s power. You may also need a trim removal tool for safely lifting interior panels. Having these tools ready in advance will save you time and make the process more efficient.
Preparing Your Vehicle for Installation
Before installation, park the vehicle in a well-lit area and disconnect the battery for safety. Clear the workspace inside the car and make sure the dashboard and rear areas are accessible. Remove any items from the dashboard and back seat that may interfere with the installation process, and ensure you have ample space to work.
Mounting the Rear View Mirror Camera on Your Vehicle
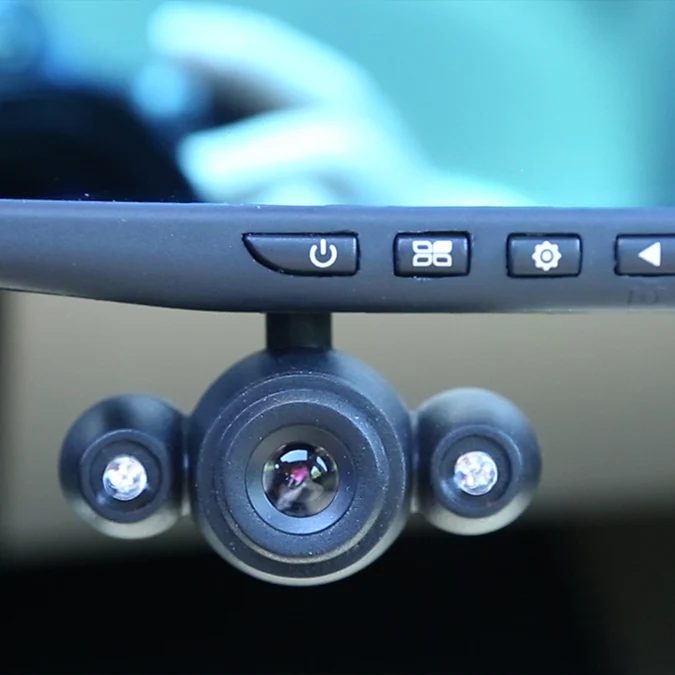
Mounting the camera is a critical step in installation. Position the camera on the rear view mirror or directly on the windshield if using a dash cam style system. Use the mounting adhesive or bracket provided with your kit, ensuring it’s secure and level. This placement provides an unobstructed view and reduces vibration while driving.
Wiring the Rear Camera to Your Vehicle
Run the camera wiring along the vehicle’s interior, hiding cables under trim panels whenever possible. Use a trim removal tool to lift panels gently and feed the wires along the roofline and down to the trunk or rear of the car. Secure any loose wiring with electrical tape or zip ties to prevent interference with other components.

Connecting the Camera to the Rear Power Supply
Locate the power source near the rear of your vehicle, typically near the brake or reverse lights. Using a fuse tap or wire tap, connect the camera’s power wire to the vehicle’s power supply. Be sure to follow the wiring diagram provided with your camera kit for accurate connections. Reconnect the battery to test the power connection.
Testing the Rear View Camera System
Once the camera is wired, test the system to ensure it functions correctly. Turn on your vehicle and shift into reverse to activate the camera display. Check for clear visuals and make adjustments to the camera angle if necessary. Adjust settings on the rear view mirror dash cam for the best view of the area behind your vehicle.
Adjusting the Camera Angle for Optimal View
Positioning the camera angle is important for visibility. Use the camera’s adjustable bracket to find an angle that provides a full view of the rear area without obstructions. The ideal position should show the road, curb, and potential obstacles. A proper angle will help maximize safety during backing and parking.
Securing Loose Wires and Finalizing Installation
After testing, secure any remaining loose wires to prevent interference or damage. Use zip ties and electrical tape to keep wires tightly in place and avoid tangling with other components. Inspect all connections to ensure they are secure, and replace any interior panels or trim that were removed during the installation.
Setting Up the Display and Features
Configure the display on your rear view mirror camera according to your preferences. Adjust brightness, contrast, and other settings for optimal visibility in various lighting conditions. Some rear view mirror dash cam also offer advanced features like lane departure warnings and recording options, which you can activate as needed.
Troubleshooting Common Issues
During installation, you may encounter issues such as a blank screen, blurry video, or weak connections. Double-check all power connections and wiring to ensure they are secure. If issues persist, consult the user manual or contact customer support. Adjusting camera angles or upgrading wiring may resolve persistent problems.
Maintaining Your Rear View Mirror Camera System
Regular maintenance ensures optimal performance from your rear view mirror camera system. Clean the camera lens periodically to remove dust and dirt, and inspect wiring for wear or damage. A well-maintained system will provide reliable visuals, reduce blind spots, and improve driving safety over time.
Will a Rear View Mirror Camera Fit in My Car?
Rear view mirror cameras are generally compatible with most vehicle models. However, check your car’s specifications to confirm the dimensions and available power options. Some mirror mounts may require additional adapters for compatibility, which are often included in the camera kit.
Is Professional Installation Recommended?
While a rear view mirror camera system can be installed at home, professional installation may be beneficial for complex setups or if you lack the necessary tools. Professional installers can ensure accurate wiring, secure mounting, and full functionality without the risk of error or damage.
Can I Use a Rear View Mirror Camera in All Weather Conditions?
Most rear view mirror cameras are designed to withstand various weather conditions, including rain and extreme temperatures. Look for cameras with weather-resistant housing if you frequently drive in harsh conditions. Regularly clean the lens and inspect the camera for signs of wear, especially after winter weather.
READ MORE…..

